
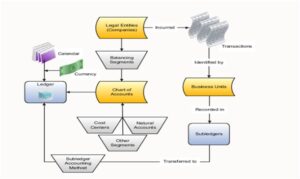
Rapid implementation is a way to configure a financial enterprise and financial reporting structures quickly using sheets in a workbook that upload lists of:
- Companies (legal entities)
- Ledgers by country
- Business units
- Chart of accounts and segment values
- Segment value hierarchies
- Financial sequences
- Required sub ledger accounts
Once the sheets have been uploaded, the application creates:
- Chart of accounts structure and instance
- Segment value hierarchies
- Key accounts such as retained earnings
- Required sub ledger accounts
- Accounting calendar
- Primary ledger for each country represented on the legal entities sheet
- Legal entities and their locations
- Business units
- Document and journal sequencing
- Set of Financial Reporting reports
- Three account groups
Create User and Add the following Roles to the user.
- General Accountant
- General Accounting Manager
Navigation: Tools > Security Console
Users > Add User Account
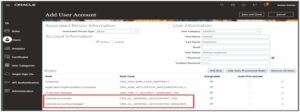
Click on username and click on Setup and Maintenance
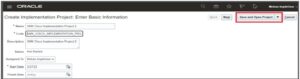
 Create an implementation project
In the Setup and Maintenance work area, create an implementation project that includes the Define Financials Configuration for Rapid Implementation task list.
Click on Global Search and Click on Manage Implementation Projects
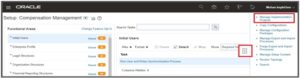
Click on + icon to create a implementation project,
Enter the required data and click on the Save and Open Projects button.
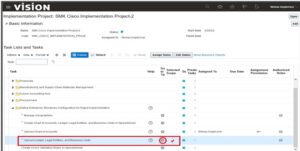
Click on + and Search for %Rapid%Impl% in the Implementation Project screen.
Select Define Enterprise Structures Configuration for Rapid Implementation and Apply and Done.
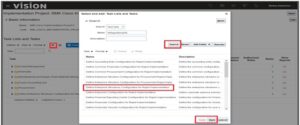
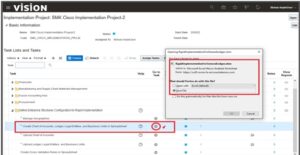
Select Create Chart of Accounts, Ledger, Legal Entities, and Business Units in Spreadsheet and Click on Go to Task.
– It will download a spreadsheet.
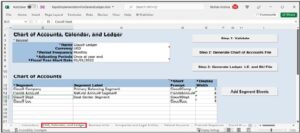
The RI workbook includes the following sheets:
-Instructions, Chart of Accounts, Calendar, and Ledger, BU, Companies and Legal Entities
Natural Accounts, and Financial Sequences
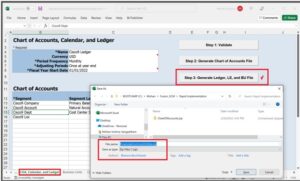
Open the Excel File, Enter the required data at the COA, Calendar, and Ledger Sheet
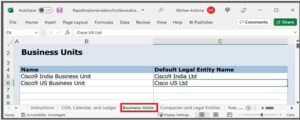
Go to the Business Units sheet and add the legal entity and Business Unit.
Go to Companies and Legal Entities sheet and enter the Company code and details.
Go to the Natural Accounts tab and enter the accounts.
Go to Financial Sequences and update the data.

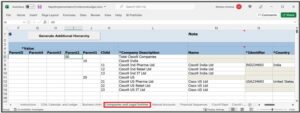
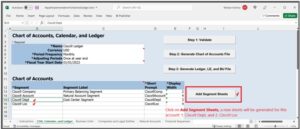
By default, we do not have sheets for other segments like Cisco9 Dept, Cisco9 Locin COA sheet.
So, click on Add Segment Sheets.
Based on the segments in COA, new sheets will be generated.
New Sheets are:
- Cisco9 Dept
- Cisco9 Loc
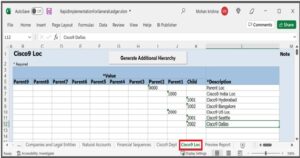
Go to Cisco9 Deptsheet and enter code and description details.
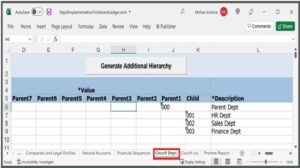
Go to Cisco9 Locsheet and enter code and description details.
Go to COA, Calendar and Ledger sheet and click on Validate button.
Note: If there is an error. It will re-route to the Review sheet to see the list of errors and warnings. After it was resolved. Click on Validate again till no error.
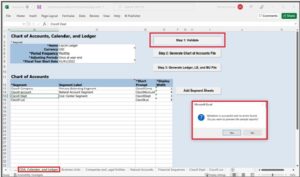
Verify the accounts in Preview sheet.
Click on Generate Chart of Accounts File. It will generate a ChartOfAccounts.zipfile. Save it to your PC.

Click on Generate Ledger, LE and BU File button. It will generate a FinancialsCommonEntities.zip file. Save it to your PC.
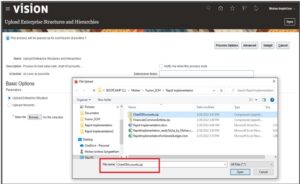
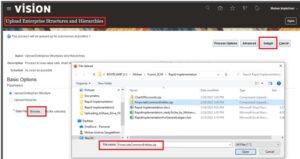
Click on Upload Chart of Accounts link

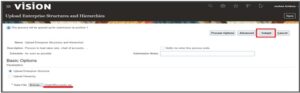
Select Upload Enterprise Structure radio button and upload CharOfAccounts.zip.
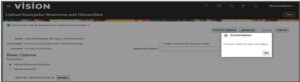
click on the Submit button.
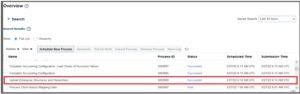
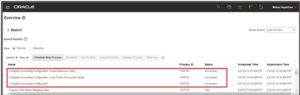
Programs will be submitted.
and should be Succeeded. And then click on the Done button.
Click on Upload Ledger, Legal Entities, and Business Units.
Select Upload Enterprise Structure radio button and upload Financials Common Entities.zip file. And then click on the Submit button.
Corresponding programs should be completed.

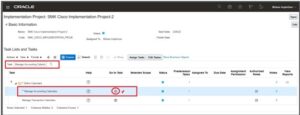
Search for Manage Accounting Calendars in the Implementation Project screen.
Click on Go to Task icon against Manage Accounting Calendars
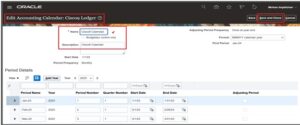
Select Cisco9 Ledger (created using spreadsheet). Click on that.
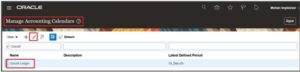
Update the name to Cisco9 Calendar and change the name of adjustment period and then click on Save and Close.
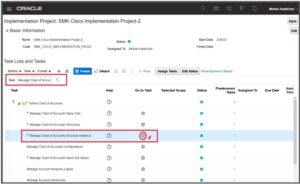
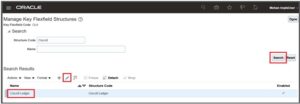
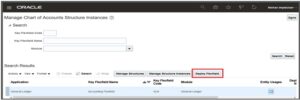
Search for %%Cha%Acc% or Manage Chart of Accounts Structure Instances in the Implementation Project screen.
Click on Go to Task against the Task Manage Chart of Accounts Structure Instances
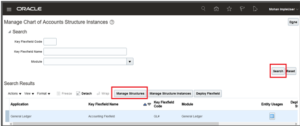
Click on Search button
Select the Flex field and click on Manage Structures button.
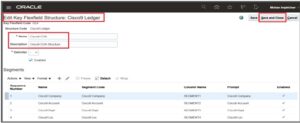
Select Cisco9 Ledger
Verify the Segments and Change the Name and Description to Cisco9 COA instead of ledger. and Click on Save and Close.
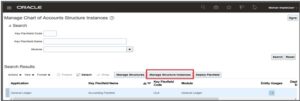
Click on the Manage Structure Instances button.
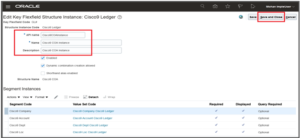
Search and click on Edit
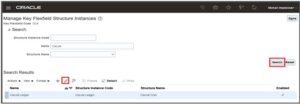
Change the Name and Description. And Click on Save and Close.
Click on Deploy Flex field.
Click on OK
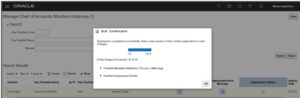
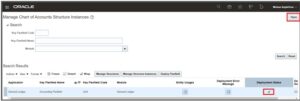
Deployment Status should be updated to tick in green color.
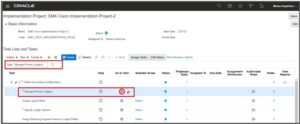
Search for Manage Primary Ledgers in the Implementation Project screen.
Click on the Go to Task button.
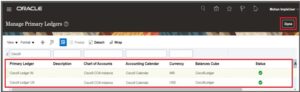
Two ledgers created based on two legal entities entered in the spreadsheet.
Click on Done.
- Cisco9 Ledger IN
- Cisco9 Ledger US
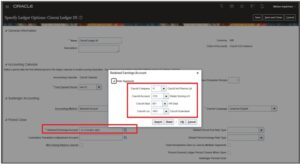
Click on Specify Ledger Options and click on the Go to Task button.
Select Specify Ledger Options radio button and
choose Select and Add option in the Primary Ledger drop down list.
Click on Apply and Go to the Task button.
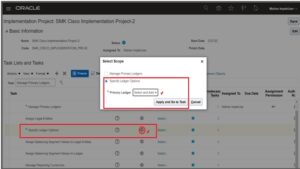
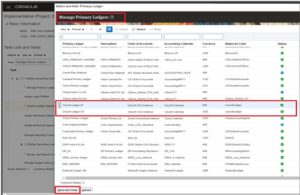
Select Cisco9 Ledger IN and click on Save and Close button.
Review the ledger form (like Retained Earning Account details …).
Selected Ledger should be updated at the Tasks against the Implementation Project.
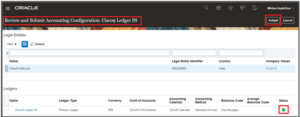
Select Review and Submit Accounting Configuration and click on the Go to Task button.
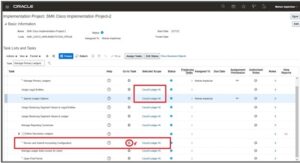
Programs should be triggered. And then review the Ledger, COA, Calendar, in the single form.
Click on the Submit button.
Program should be completed with Succeeded status.
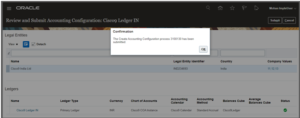
Done.
- Also read : Evolvement of Oracle Fusion Financials – Soft Online Training
